
As promised in a previous post, I am now going to further detail KeePass and give some arguments on why I like using it. For more information please refer to the KeePass website.
So, what is KeePass? KeePass is an open source password manager. This means it's a free application used to store user credentials. However, once you begin using it, you will find it can do much more than just store passwords. The nice thing about KeePass is that you can find a build/implementation for just about any OS out there. The different implementations are available for download here. Note that there is also a portable version if you don't have access rights to install the application, or if you wish to keep the entire application on an USB stick.
How KeePass works
The user credentials are stored in database files which are then encrypted using one master password and a Key file. The database files have the .kdbx or .kdb file extensions. As any keen Microsoft Office user will tell you, adding an "x" to the end of the extension makes the corresponding file less crappy and much, much cooler. KeePass 2 for Windows uses the .kdbx file extension. Unlike Ms. Office, however, you can easily import and export KDB files without having to worry about data loss.
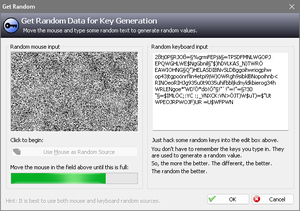
When creating a new database you will be prompted to choose a password and a key file. Both will be used to lock the database. I particularly like how the key file is generated (see image below). Prompting you to move the mouse just gives a feel of more randomness then just generating some values and sowing them to the user. I don't think I have to mention why you should NOT share this key with anyone.
The last step in creating the database file is to choose a master password. Trust me, this is difficult. Obviously, you need to choose a strong password here. But, also think that you will have input this password many times a day, sometimes using on-screen keyboards. I would recommend a password that can be typed as ergonomically as possible.
So now that the database is created you can start adding entries in it. You can create groups, subgroups for passwords (e.g. Social Network group, email group, etc.). You can change the icon of each group to a predefined icon used by KeePass or to custom icons (this features is actually really nice). When creating a group also check the Auto-Type tab, as any entry created in this group will inherit this Auto-Type.
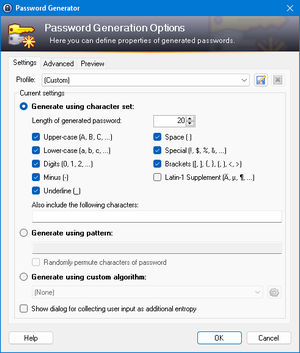
The next step is to add the actual entries. For each entry you can add the title, username, password, URL (here it is preferable to add the URL where you will perform the login: https://www.google.com/accounts/ServiceLogin instead of simply http://www.google.com) some notes about the entry and a date when the entry (or password) expires. Like with the key file, KeePass has a really nice and powerful password generator.

The Advanced tab allows you to add more information about the entity. You can add String fields and file attachments. For example, if you have mobile phone contract, you can add the PIN and PUK as strings (I would select the "enable in memory protection" option) and the contract as a PDF attachment. All the values inserted here will be encrypted.
The Properties tab allows you to choose properties like the background and foreground colors, etc. The Auto-Type tab is very important as it allows you to choose what actions should be taken on Auto-Type. The default one is {USERNAME}{TAB}{PASSWORD}{ENTER} (just like you would do if you want to login). You can make your custom auto-types as well (like {PASSWORD}{ENTER} if just need to type the password). The final tab presents a history of the entity.
Once you finished adding all your passwords, it's time to start using KeePass. When an application asks you for your credentials press Ctrl+Alt+K and the KeePass window will pop up. Select the appropriate entry and press Ctrl+V and the auto-type will be performed. Here are the most important shortcuts
- Ctrl+Alt+K - Show KeePass window
- Ctrl+V - Perform auto-type
- Ctrl+B - Copy username to clipboard
- Ctrl+C - Copy password to clipboard (note that after a given number of seconds it will be erased from the clipboard)
- Ctrl+U - Open entry's URL in default browser
Settings I recommend

Just installing KeePass won't be enough to protect yourself. Here are some settings I recommend in order to make KeePass more secure and easier to use (to open the setting go to Tools-Options):
- Under the Security Tab
- Lock workspace after KeePass inactivity - Select this one. I left the default 300s. It is useful if you have the habit of not locking your workspace when you are taking a break.
- Clipboard auto-clear time - I left this to 5s. This is the time after which any data (like password) will be cleared from the clipboard. So if you select an entry and press Ctrl+C, the password will be cleared from the clipboard after the selected time
- Lock workspace when minimizing main window - Check this to lock when the main window is minimized
- Under the Interface tab
- Close button [X] minimizes main window instead of terminating the applications - Check this. It saves a lot of WTF's when you press Ctrl+Alt+K and the KeePass window does not popup
- Minimize to tray instead of taskbar - Check this if you have a space problem on your taskbar
- Minimize main window after copying data to the clipboard - This is very useful if you are just being asked for a password. You press Ctrl+Alt+K, select the entry, press Ctrl+C and then the KeePass window minimizes and you just have to press Ctrl+V in the application that asks for your password
- Focus entry after quick search - Very useful. You should check this one
- Under the Integration Tab
- Select the Run KeePass at Windows startup option
- For the rest of the settings I recommend you use the default values
Sync KeePass databases
If you are using more than one computer you might need some sort of sync mechanism for password databases. While KeePass does not provide this directly, there is a plugin that can help. It is called KeePassSync.
Close KeePass, and then download the plugin. Copy the KeePassSync.plgx file to the KeePass installation directory and start KeePass. Go to Tools-KeePassSync-Show Options. Select one of the providers mentioned there and create an account. Even if you already have an account with one of those providers I recommend that you create another account where you just keep the password database. DO NOT upload the key file to this account.
Once you created the account simply click the Edit KeePass Entry and enter the username and password. Under the General tab check the Synchronize option. Click ok. Your database should now be in sync. If not, go to Tools-KeePassSync-Sync. On the other computers you just need to enter the username and password of the provider and click Sync
Why use KeePass
Well, because it's safe. Up until now, none of the encryption methods it uses have been broken, so your password should be safe. As for me, there are many reasons while I prefer this application to others:
- It is a standalone application, not some browser plugin - This means I know when the application is running, when the database is open, and when it closed. It also means that I can store passwords for archives, sensitive data such as contracts, etc.
- It is really easy to use - With just a couple of key combinations you can use the application without the need to play around with the mouse. Much faster than typing your username and password every time.
- Key file-password combination provides better security - Even if someone finds out your password he cannot gain access to the database without the key file (and vice versa). If you are really paranoid about someone getting access I recommend you store the key file (maybe even the database) on one of these.
- Gets around the "one password to rule them all" problem - In most password managers this is a problem. If someone finds your password then you are in trouble. But with KeePass there is a difference. First there is the above mentioned key file-password combination. Secondly, you don't have to have "one password to rule them all". You can have multiple passwords to rule some passwords. Nobody is forcing you to put all your passwords in ONE database file. You can create as many as you want and choose different passwords/keys for each one.
- Synchronization is an option, not a must - This is one of my favorite features. Unless you want to, which means that you must create all the sync parameters, all the data is stored locally. You (not somebody you have to trust in) have full control over the access of the data. This is why I prefer it to LastPass. Which do you think is more appealing to a hacker? To waste his time trying to hack your passwords in the hope that maybe you stored some passwords that will enable him to steal some money, or a treasure chest of databases filled with user credentials from thousand if not millions of users. This is the biggest problem in any Identity Management service offered via the Internet. It represents a single point of failure. Just think of how much damage could occur if a service like LastPass loses all the passwords it stores. With KeePass, even if you use the sync feature, you have control where you store the database and more importantly, it is not centralized in a treasure chest of password databases.
And finally
If you have more questions about KeePass feel free to post them as comments to this blog.
P.S. I really like the Google Chrome spell-checker, which does not recognize KeePass and gives as the first suggestion "Keep ass"
No comments:
Post a Comment